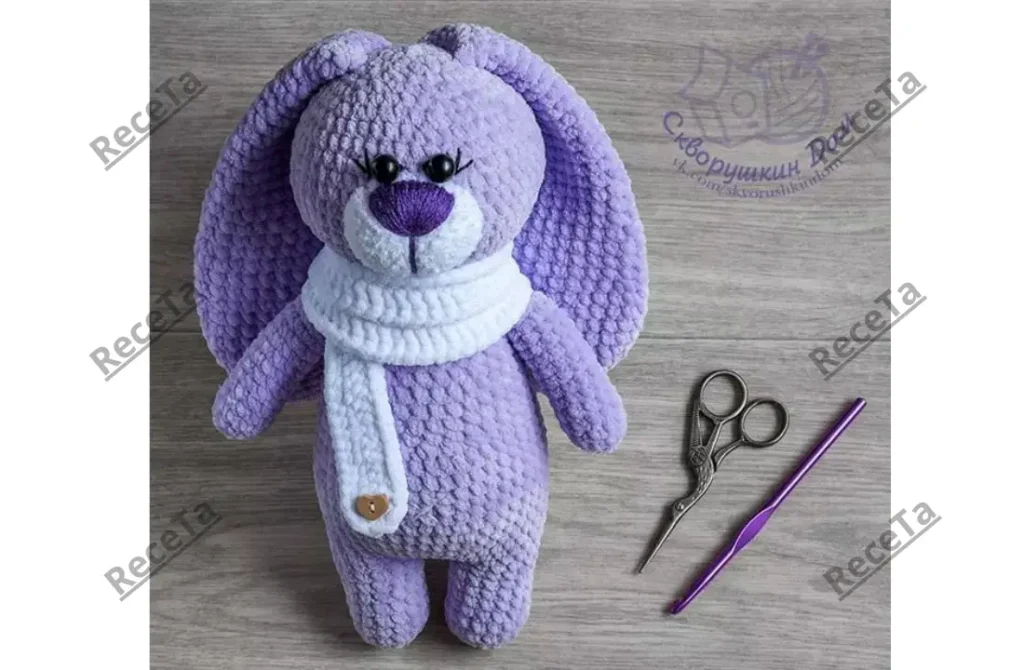
Free Crochet Masterclass: Lavender Bunny by Anna Skvortsova
In this masterclass, you will learn how to crochet a cute plush bunny wearing a scarf. This amigurumi project works well with any plush yarn, such as YarnArt Dolce, Himalaya Dolphin Baby, or Kamtex Velour. You will need about 1 skein of YarnArt Dolce for the bunny. The finished toy will be approximately 23 cm tall.
Materials and Tools
- Plush yarn YarnArt Dolce (for the bunny)
- Yarn Alize Baby Soft (for the muzzle and tail)
- Yarn YarnArt Jeans (for embroidering the nose)
- Crochet hook 5.5–5 mm
- Safety eyes for the toy
- Stuffing for the toy
- Needle for attaching parts
- Scissors
You can purchase all the necessary materials here.
Abbreviations
- KA — Magic ring
- v.p. — Chain stitch
- ss — Slip stitch
- sc — Single crochet
- dec — Decrease
- inc — Increase
- (…) x n — Repeat n times
Crochet Pattern for the Lavender Bunny
Ears (2 Parts)
Using a 5.5 mm crochet hook:
- Round 1: Ch 2, 6 sc in the second chain from the hook (or 6 sc in a magic ring)
- Round 2: (1 sc, inc) x 3 (9)
- Round 3: (2 sc, inc) x 3 (12)
- Round 4: (3 sc, inc) x 3 (15)
- Round 5: (4 sc, inc) x 3 (18)
- Round 6: (5 sc, inc) x 3 (21)
7-9. Rounds 7-9: 21 sc (3 rounds) - Round 10: (5 sc, dec) x 3 (18)
9-10. Rounds 11-12: 18 sc (2 rounds) - Round 13: (4 sc, dec) x 3 (15)
12-13. Rounds 14-15: 15 sc (2 rounds) - Round 16: (3 sc, dec) x 3 (12)
15-16. Rounds 17-18: 12 sc (2 rounds) - Round 19: (2 sc, dec) x 3 (9)
18-20. Rounds 20-22: 9 sc (3 rounds) - Round 23: (1 sc, dec) x 3 (6)
Join the two sides of the ear with 3 sc, cut the yarn, secure the end, and hide it inside.
Front Paws (2 Parts)
Using a 5 mm crochet hook:
- Round 1: Ch 2, 6 sc in the second chain from the hook (or 6 sc in a magic ring)
- Round 2: (inc, 1 sc, inc) x 2 (10)
3-9. Rounds 3-9: 10 sc (7 rounds) - Round 10: (dec, 1 sc, dec) x 2 (6). Optionally, add some stuffing to the paw. Join the two sides of the paw with 3 sc, cut the yarn, secure the end, and hide it inside.
Body and Head
The front paws and ears are attached during the crochet process. Use a 5 mm crochet hook. Start with the left front paw:
- Round 1: Ch 2, 6 sc in the second chain from the hook (or 6 sc in a magic ring)
- Round 2: 6 inc (12)
3-6. Rounds 3-6: 12 sc (4 rounds). Sl st, cut the yarn, and secure the end.
Crochet the right front paw similarly, then join them:
- Round 7: Ch 1; 12 sc along the left paw; make a sc in the first sc of the left paw; 1 sc in the ch; 12 sc along the right paw; make a sc in the first sc of the right paw (28 stitches). Mark the beginning of the round here.
8-13. Rounds 8-13: 28 sc (6 rounds) - Round 14: 5 sc, (dec, 5 sc, dec) x 2, 5 sc (24)
- Round 15: 24 sc
- Round 16: (6 sc, dec) x 3 (21)
- Round 17: 21 sc
- Round 18: (5 sc, dec) x 3 (18)
- Round 19: (1 sc, dec) x 6 (12)
- Round 20: Attach the front paws: 3 sc; 3 sc, catching the paw; 3 sc; 3 sc, catching the second paw.
- Round 21: (1 sc, inc) x 6 (18)
- Round 22: (2 sc, inc) x 6 (24)
- Round 23: (3 sc, inc) x 6 (30)
19-23. Rounds 24-28: 30 sc (5 rounds) - Round 29: (3 sc, dec) x 6 (24)
- Round 30: (2 sc, dec) x 6 (18)
- Round 31: (1 sc, dec) x 5, 1 sc; attach the ears: dec, catching the ear; dec – sc (with the ear); sc – dec (without the ear); dec, catching the ear; 5 dec, close the opening, cut the yarn, and secure the end.
Muzzle
Use 2 strands of yarn and a 5 mm crochet hook:
- Round 1: Ch 2, 6 sc in the second chain from the hook (or 6 sc in a magic ring)
- Round 2: 6 inc (12)
- Round 3: (1 sc, inc) x 6 (18)
- Round 4: 18 sc, leave a long tail for sewing, and secure the yarn.
Tail
Use 2 strands of yarn and a 5 mm crochet hook:
- Round 1: Ch 2, 6 sc in the second chain from the hook (or 6 sc in a magic ring)
- Round 2: 6 inc (12)
- Round 3: 6 dec (6), leave a long tail for sewing, and secure the yarn.
Assembly and Finishing
- Attach the muzzle and tail.
- Embroider the nose with a large needle.
- Attach the safety eyes. Optionally, embroider whiskers with the same yarn used for the nose.
- Add a scarf or ribbon around the bunny’s neck.
This adorable lavender bunny is now complete! You can customize it further with different accessories or yarn colors to make it uniquely yours. Happy crocheting!
Feel free to copy and paste this formatted content into your WordPress blog. Let me know if you need further adjustments!