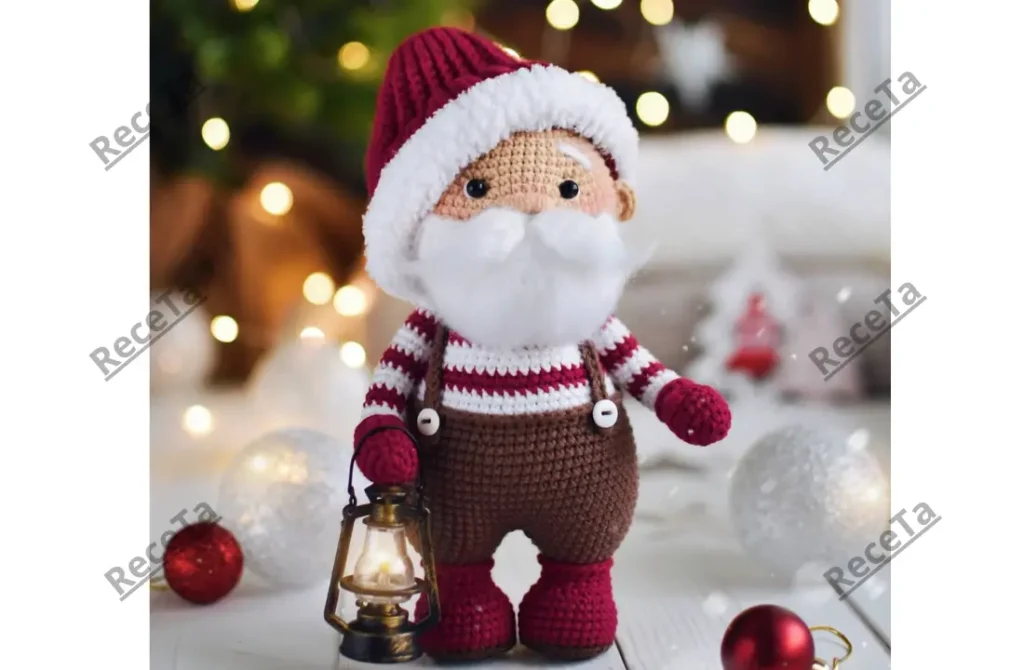
Amigurumi Toy Pattern
If you enjoy making amigurumi, here I share this easy and free amigurumi pattern for you. Your kids will love these toys!
MATERIALS
- Yarn: DK lightweight yarn or sport yarn.
- I used the following yarn: Schachenmayr Catania
- Skin
- Dark
- White
- Red
- Hook: Size 2.00 mm or other size suitable for you.
- Safety eyes: 6.00 mm
- Needles for sewing
- Fiberfill
ABBREVIATIONS
- Rnd/Rw – round/row
- MR – magic ring
- st/sts – stitch/stitches
- ch – chain
- sc – single crochet
- inc – increase
- dec – single crochet decrease (use invisible decrease)
- BLO – back loop only
- FLO – front loop only
- hdc – half double crochet
- dc – double crochet
- slst – slip stitch
- ( … ) * x…. – repeat instructions x times
LEGS AND BODY
Start with dark yarn:
- Make 9 ch, start in the second ch from the hook.
- Rnd 1: inc, 6 sc, 4 sc into the last stitch, work along the other side: 6 sc, inc (20)
- Rnd 2: 2 inc, 6 sc, 4 inc, 6 sc, 2 inc (28)
- Rnd 3: (sc, inc) x 2, 6 sc, (sc, inc) x 4, 6 sc, (sc, inc) x 2 (36)
- Rnd 4: BLO 36 sc
- Rnd 5: 36 sc (36)
- Rnd 6: (3 sc, dec) x 6 (30)
- Rnd 7: 30 sc (30)
- Rnd 8: (2 sc, dec) x 6 (24)
- Rnd 9: 24 sc
- Change to red yarn:
- Rnd 10: BLO (sc, inc) x 6 (18)
- Rnd 11: 18 sc
- Rnd 12: (sc, inc) x 6 (24)
- Rnd 13: 24 sc
- Rnd 14: (2 sc, inc) x 6 (30)
- Fasten off, stuff with fiberfill.
- Make the detail: Working in the FLO of Rnd 4: 1 ch, 36 slst. Fasten off.
Make the second leg the same way as the first leg but do not cut the yarn.
Start from the last point of the second leg. Determine the midpoint of the first leg. Then join the legs together to make the body.
- Make 2 ch to connect with the first leg.
- Rnd 14: 2 ch, 30 sc (leg 1), 2 sc (on the chain), 30 sc (leg 2) (60)
- Rnd 15 – 17: 60 sc
- Rnd 18: (11 sc, inc) x 5 (65)
- Rnd 19: (12 sc, inc) x 5 (70)
- Rnd 20: (13 sc, inc) x 5 (75)
- Change to dark yarn.
- Rnd 21 – 23: 75 sc
- Change to red yarn.
- Rnd 24: 75 sc
- Rnd 25: (13 sc, dec) x 5 (70)
- Rnd 26: (5 sc, dec) x 10 (60)
- Rnd 27: (8 sc, dec) x 6 (54)
- Rnd 28: 54 sc
- Rnd 29: (7 sc, dec) x 6 (48)
- Rnd 30 – 31: 48 sc
- Rnd 32: (6 sc, dec) x 6 (42)
- Rnd 33 – 34: 42 sc
- Rnd 35: (5 sc, dec) x 6 (36)
- Rnd 36: 36 sc
- Rnd 37: (4 sc, dec) x 6 (30)
- Rnd 38: 30 sc
HEAD
Use skin yarn:
- Rnd 1: MR 6 sc (6)
- Rnd 2: 6 inc (12)
- Rnd 3: (sc, inc) x 6 (18)
- Rnd 4: (2 sc, inc) x 6 (24)
- Rnd 5: (3 sc, inc) x 6 (30)
- Rnd 6: (4 sc, inc) x 6 (36)
- Rnd 7: (5 sc, inc) x 6 (42)
- Rnd 8: (6 sc, inc) x 6 (48)
- Rnd 9 – 14: 48 sc
- Rnd 15: (7 sc, inc) x 6 (52)
- Rnd 16 – 19: 52 sc
- Rnd 20: (7 sc, dec) x 6 (48)
- Rnd 21: (2 sc, dec) x 12 (36)
- Rnd 22: (4 sc, dec) x 6 (30)
- Fasten off, leaving a long tail for sewing.
- Insert the 6.00 mm safety eyes between Rnd 15 and Rnd 16 with 8 sts apart.
NOSE
Use skin yarn:
- Rnd 1: MR 6 sc (6)
- Rnd 2: 6 inc (12)
- Rnd 3: (sc, inc) x 6 (18)
- Rnd 4: 18 sc
- Rnd 5: (sc, dec) x 6 (12)
- Rnd 6: 6 dec (6)
- Fasten off, leave a long tail for sewing.
- Fold the nose and sew the 2 sides together to close the opening.
EARS
Use skin yarn:
- Rnd 1: MR 6 sc (6)
- Rnd 2: 6 inc (12)
- Rnd 3: (sc, inc) x 6 (18)
- Rnd 4 – 5: 18 sc
- Rnd 6: (sc, dec) x 6 (12)
- Fasten off, leave a long tail for sewing.
- Fold the ear and sew the 2 sides together to close the opening.
- Sew ears between Rnd 16 and Rnd 17 of the head. The space between the eye and ear is 8 sts.
BEARD
Use white yarn:
- Rnd 1: MR 6 sc (6)
- Rnd 2: 6 inc (12)
- Rnd 3: (sc, inc) x 6 (18)
- Rnd 4 – 5: 18 sc
- Rnd 6: (2 sc, inc) x 6 (24)
- Rnd 7 – 8: 24 sc
- Rnd 9: (3 sc, inc) x 6 (30)
- Rnd 10 – 11: 30 sc
- Rnd 12: (4 sc, inc) x 6 (36)
- Rnd 13 – 14: 36 sc
- Rnd 15: (5 sc, inc) x 6 (42)
- Rnd 16 – 17: 42 sc
- Rnd 18: (6 sc, inc) x 6 (48)
- Do not stuff. Working through both sides:
- Rnd 1: 1 ch, 24 sc, turn (24)
- Fasten off, sew beard between Rnd 18 and Rnd 19 of the head.
ARMS
Start with skin yarn:
- Rnd 1: MR 6 sc (6)
- Rnd 2: (sc, inc) x 3 (9)
- Rnd 3: (2 sc, inc) x 3 (12)
- Rnd 4 – 5: 12 sc
- Change to white yarn:
- Rnd 6 – 20: 12 sc
- Do not stuff. Working through both sides with 6 sc.
- Use red yarn to sew the stripes.
- Fasten off, leave a long tail for sewing and attaching to body between Rnd 38 and 39.
HAT
Use dark yarn:
- Rnd 1: MR 6 sc (6)
- Rnd 2: 6 inc (12)
- Rnd 3: (sc, inc) x 6 (18)
- Rnd 4: 18 sc
- Rnd 5: (2 sc, inc) x 6 (24)
- Rnd 6: 24 sc
- Rnd 7: (3 sc, inc) x 6 (30)
- Rnd 8: 30 sc
- Rnd 9: (4 sc, inc) x 6 (36)
- Rnd 10: 36 sc
- Rnd 11: (5 sc, inc) x 6 (42)
- Rnd 12: 42 sc
- Rnd 13: (6 sc, inc) x 6 (48)
- Rnd 14: 48 sc
- Rnd 15: (7 sc, inc) x 6 (54)
- Rnd 16: 54 sc
- Rnd 17: 4 sc, inc, (8 sc, inc) x 5, 4 sc (60)
- Rnd 18: 60 sc
- Rnd 19: (9 sc, inc) x 6 (66)
- Rnd 20: 66 sc
- Fasten off, use white yarn to make snow on the hat.